Posts

How to fix VMnet0 not running

  Click Start → Control Panel → Network and Internet → View Network status and tasks → Change adapter settings. Right-click any network adapter icon and click Properties. Select VMware Bridge Protocol and click Uninstall. Click Install. Select Service and click Add. Select VMware Bridge Protocol and click OK. Go to the Edit menu Select Virtual Network Editor Select "Restore Default" It will take a few minutes but after that it will work fine.
RSSOwl installation

Download "RSSOwl.2.2.1.Linux-x64.zip" or latest version and unzip in home directory. This application doesn't need installation. Install Oracle JDK. Click on the the RSSOwl file to launch application. Issues i faced during reading feed -  browser creation error This issue has been resolved by # sudo ln -s /usr/lib/x86_64-linux-gnu/libhunspell-1.3.so.0 /usr/lib/x86_64-linux-gnu/libhunspell-1.2.so.0 #cd /home/kamlesh/rssowl/xulrunner #./xulrunner --register-global Reference has been taken from: https://developer.mozilla.org/en-US/docs/Archive/Mozilla/XULRunner/1.8.0.4#Installing_XULRunner https://superuser.com/questions/783429/rssowl-was-unable-to-create-a-browser-for-reading-news

How to configure proxy setting for docker in Centos 7

HTTP/HTTPS proxy The Docker daemon uses the HTTP_PROXY , HTTPS_PROXY , and NO_PROXY environmental variables in its start-up environment to configure HTTP or HTTPS proxy behavior. You cannot configure these environment variables using the daemon.json file. This example overrides the default docker.service file. If you are behind an HTTP or HTTPS proxy server, for example in corporate settings, you will need to add this configuration in the Docker systemd service file. Create a systemd drop-in directory for the docker service: $ mkdir -p /etc/systemd/system/docker.service.d Create a file called /etc/systemd/system/docker.service.d/http-proxy.conf that adds the HTTP_PROXY environment variable: [ Service ] Environment = "HTTP_PROXY=http://proxy.example.com:80/" Or, if you are behind an HTTPS proxy server, create a file called /etc/systemd/system/docker.service.d/https-proxy.conf that adds the HTTPS_PROXY environment variable:

How to access internet through proxy on elinks

Image
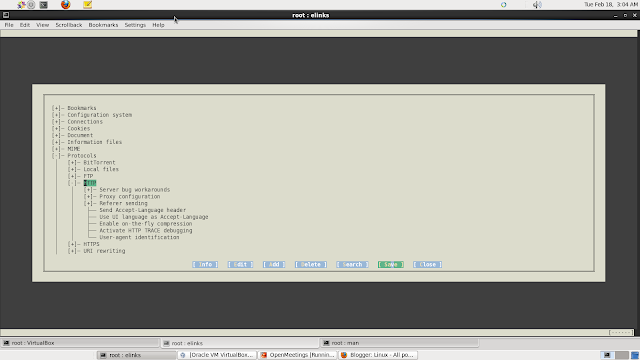
Elinks Proxy setting To use proxy for elinks create the following file for a user: vi $HOME/.elinks/elinks.conf set protocol.http.proxy.host = "proxy.host:3128" set protocol.https.proxy.host = "proxy.host:3128" set protocol.http.proxy.user = "user" set protocol.http.proxy.passwd = "pass" Same configuration we can use in /etc/elinks.conf file for system wide configuration. Or we can run elinks command to configure elinks in terminal window.

Linux AD integration trubulshooting

While performing AD integration I faced below issue which has bee fixed as below.  [root@HOSTNAME ~]# net ads join -U administrator administrator's password: Using short domain name -- INDORE-LOCAL Failed to set servicePrincipalNames. Please ensure that the DNS domain of this server matches the AD domain, Or rejoin with using Domain Admin credentials. Deleted account for 'HOSTNAME' in realm 'INDORE-LOCAL.COM' Failed to join domain: Type or value exists Above error was due to /etc/hosts file in which hostname was resolving on loopback ip 127.0.0.1 as below. PING SERVERNAME-16-2 (127.0.0.1) 56(84) bytes of data. 64 bytes from SERVERNAME-2 (127.0.0.1): icmp_seq=1 ttl=64 time=0.070 ms I removed hostname from 127.0.0.1 line in /etc/hosts file. wbinfo -a and -g was showing domain users but getent was not listing domain users id kamlesh.patidar was not showing id details of the user. Issue has been resolved by deleting .tdb files as

SSH using Private key

Image
SSH Server IP - 192.168.1.2 - server2 (rhel 6.5) SSH Client IP - 192.168.1.102 - rhel5-1 (rhel 5.5) Steps on Server- Here we are creating RSA Private/public key pair. Now copy public key as authorized_keys. Below is the Private key which needs to be copied. Copy Key from begin line to end line as below. Steps on Client - Create a file and paste copied key(form server) to this file. below we are using file name file1. This file(file1) permission shoud be either 600 or 400. Now login on Server using this private key(file1). If we don't want to use i option at the time of connecting as above then create a file .ssh/config and configure it as below. Now we will be able to login on server without using i option in connecting command.